30 August 2010
Agribox
The little oak box didn't turn out too badly after all...you can see from the pic that the 'precision sanding' technique worked very well as the front of the lid sits true and level.
The whole effect is fairly chunky and could have been made just a fraction slimmer...for certain the handle is a bit 'agricultural' and had I made it a little daintier then the overall effect would be a bit 'lighter'. The dovetails also extend by around 3mm which on a small box this size is probably too much...2mm would have been more in keeping. The Japanese paring chisels were great for this as the finish on the dovetails has been left straight from the tool, with just a wipe of worn 240g paper to take off the arris.
What's always intrigued me is that a decent piece of work can be made from a couple of lumps of gash timber in the off-cuts box and amazingly...I've still got enough left over to do another one (but not anytime soon) as I'm up and away on holiday...
28 August 2010
Precision papering...simples!
I had a problem.
As you are well aware by now, I have plenty of them and sometimes they defy my feeble attempts at a 'fix' (thereby blunting the bandsaw blade teeth a little more)
Sometimes though, the 'fix' is such a stroke of pure brilliant, unadulterated genius that it makes my head swim.
First and foremost, the first pic shows the interior of a little oak box wherein the lid sits inside the rebate on the two surfaces (arrowed) However, much to my dismay, those two surfaces were not parallel when the box came out of the cramps, so that when the lid was fitted for the first time, one corner was down by around 3mm (even though the lid was true)...possibly bandsaw fodder before too long!
Second and foremost...how to go about fixing it? I had a deep ponderation for a long while and various nefarious options wafted across the grey goo such as:
...spending a lot of cash on a hideously expensive LN chisel plane, which would probably be be used for this job and then sold. Building a complicated router jig to remove the offending high spots from each corner. Doable, but unnecessarily complicated.
Eventually, after a further eon had passed, I wondered what the simplest way would be, as 'simple' is usually much better than complicated.
The easy way was simply to sand it off!
All I did was to get hold of small bit of 12mm ply and shoot the edges dead square. A piece of 150g paper was stuck to one side (using double sided tape) and 220g to the other. This was then trimmed off level with a Stanley knife. Ten minutes work with my new precision sanding block and all four of the bearing surfaces for the lid were level and parallel...cut the hinge recesses a fraction deeper to suit and Robert's your aunty's sister (or something like that!)
Sometimes, my undoubted genius for fixing cock-ups requires the purchase of a least a gallon of the 'good stuff' just to keep the halo polished...simples!
25 August 2010
Convolutedly complex
No posts hereabouts for a week or so, mainly 'cos I've started back at work after a few months off with a medical condition which is now thankfully under control...as long as I keep on taking the tablets I should be good for a few more years making sawdust!
However, things have not been quiet in the 'shop as I used the last few days before starting work to make a small oak box, mainly using the exposed and rounded dovetails that I had a go at a few days ago. I'm due to shortly get hold of another lump of air dried English oak (of which more later) As I had a couple of smallish pieces left over from the last lot and the vendor was selling it to me for a very reasonable price, it would be good if he and his new partner could have something made from it. It's almost done as I just need to finish off the scribed and mitered lining tonight and then start polishing. As always though, fitting the bloody hinges caused a few headaches and was one of the more irritating parts of the job.
I got hold of a couple of books yesterday as SWIMBO unexpectedly let fly with her credit card and bought me the 'Complete Japanese Joinery' If you have some sort of pre-conceived, misbegotten idea that secret mitred dovetails ought to be rated 10/10 in terms of difficulty, then a swift dip into this little tome will very rapidly change your mind...I've never seen such complex and convoluted ways to join two (or three, of four) bits of wood. Boggling of the mind only comes close...
The other book that arrived yesterday was a hard backed edition (complete with DVD) of 'Made by Hand' from the Unplugged Woodshop I only had a quick peek into it last night, but there are one or three ideas in there that possibly hold some promise for an idea regarding the next major project. In any event, it's a decent enough book (apart from the somewhat casual Americanese style of presentation) to go into the woodwork library.
18 August 2010
Blanched
Having just finished a fairly major project, I'm really at a bit of a 'loose end' regarding another big job, but I've got one or two ideas kicking around for another cabinet of some sort, based loosely on a Japanese theme of some sort using exposed joinery, but how I'm going to do it and what it's going to look like...I've no idea, not a sausage!
I did remember though, that I had a 'foto-copy of an article from FWW about making a right angle corner joint, or 'kane tsugi'. In the square part of the joint (which is locked by a peg) lurks a hidden bridle joint, so although it looks fairly straight forward to make, there's a lot more too it. I thought I'd have a go with an oddment of mahogany, using a piece of ebony for the square peg.
In the article (which I read with a foreboding sense of deja vu), the author, being from far distant lands across the big pond, uses an unguarded table saw blade to cut some of the joint. Whilst I have a high regard for much that happens in American woodworking circles, their cavalier attitude to 'elf n'safety makes me turn pale...indeed many of their 'shop machinery practices have been illegal in Europe for decades.
Marking out and cutting were fairly straight forward, the only tricky bit was making the tenon for the bridle ( a router is the easiest and most accurate way to do that) and some judicious work with paring chisels saw the joint completed. Believe it or not, the little square pin was the hardest part to get 'spot on' as I cut the bevels once it was glued in place. I think a little work on the peg beforehand (using the mitre shooting board) is needed when I do it for real.
I also had a go at a simple through dovetail, with the end of the tail exposed and rounded over. Easy enough, but again some care needed in the cleaning up and just as a little exercise, I'm making a small Krenovianish box in English Oak with this sort of jointing...
13 August 2010
Installation
In case you're wondering what the Media Unit looks like with all the gear installed...herewith a little pic. The two big spaces are now filled with equipment assorted on 6mm smoke glass shelves so that the access holes at the back can no longer be seen. (The glare in the TV screen is generated by the lights, which unfortunately I can't do very much about)
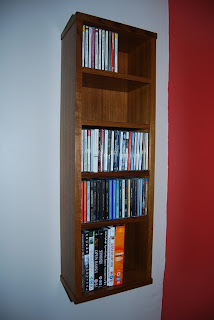
But in addition to that, I also ran up a simple unit to hold DVD's and CD's out of a few odd scabby bits of mdf that were loafing around the 'shop. As I've got acres of teak veneer and plenty of bits to use for the lipping, this little job turned out quite well for an absolutely minimum outlay, which, being a parsimonious sort of soul, I found quite agreeable...
08 August 2010
The package...
I like the postie dropping parcels onto the mat...who doesn't? I was expecting a parcel from Matthew at Workshop Heaven and sure enough, a few days ago, one did indeed drop through the letter box. I knew that it would be a replacement 6mm Ashley Isles dovetail chisel, so I didn't start leaping up and down with uncontrolled excitement like a hyperactive five year old...I thought I'd be a bit 'cool' and just open it in my own good time.
When I sauntered over to pick it up though, it was a bit heavier than it ought to have been, which immediately aroused my curiosity...what was in it to make it weighty?
Inside was a slab of nicely polished timber that I'd given Matthew at the Bash last month and which he'd returned to me, slightly thinner than when I gave it to him.
This though, is no ordinary timber...this is the 'Wood from Hell', stuff that is so interlocked, twisted and just plain bloody cantankerous that it makes even the roughest, cement encrusted scafflolding board appear like a bar of luscious, smooooth plain chocolate...
Being a generous sort of Bloke though, I'd offered to swap Matthew a board or two of this (and it has to be unique, far more desirable than even some Cuban Mahogany [which I also have]) for the merest, triffling trinket...
Nothing, zip, nada...stony ground. To say that I'm moderately disappointed is a bit of an understatement. Still, looking on the bright side, a lump of this stuff would make someone the best Secret Santa present they've ever had!
Dogs dinner
Gluing a job is a fraught affair at the best of times, sometimes it goes well, sometimes only moderately so and sometimes it's a complete disaster.
This one falls into the middle category as it went together squarely...sort of, but involved the use of so many cramps in odd places to pull it together that in no way could it be construed as a 'successful' job. Part of the problem was that the blocks glued onto the corners were softwood and disintegrated under the cramping pressure, leaving dings and dents all across the corners. No doubt my cabinet maker's iron is going to get some heavy usage later on!
This is in fact a 'fun' (hah!) competition entry on the Wood Haven and is intended to be a wall hung cabinet with four small drawers and two back panels. There will be a larger display space conforming to the Golden Rectangle, so it ought to look reasonable when it's finished.
That's if it gets finished, as it's made from a lump of 4x2" pine, which apart from Balsa wood is probably the most unsuitable timber to attempt secret mitre dovetails as it's just soft, mushy and generally completely inadequate for high quality joinery (or my feeble attempt thereof)
I shall persevere...but don't hold your breath.
03 August 2010
Flakey
Whilst nattering on about chisels and the such like, it might be worth mentioning a little encounter with one of my Ashley Isles chisels. Matthew from Workshop Heaven sent me a whole set of dovetail chisels, bar the 6mm size which was out of stock. This duly turned up a few weeks later and was without further ado honed and placed in the rack along with all the others.
I first picked it to use it a couple of weeks ago just to pare the corners of some ebony on the Media Unit handles, with the result that the edge instantly crumpled.
I didn't think much more about it, but simply re-honed it to grind back past the first mm or so of poor steel, which is often the case with a new blade.
I used it again on Sunday to pare some joints on much softer pine...and exactly the same thing happened, so I started to think I might have a 'duff' one.
I decided to grind back the blade by another mm on the Tormek, in effect turning the chisel into a miniature engineers scraper. I then re-honed it to 25 deg, which is the angle that all the others are honed at.
Then came the test.
Within 20 seconds of paring the same soft pine, the edge resembled a Cadbury's Flake but just to make sure that all the others were good, I repeated the test.
It looks like the 6mm chisel came from a suspect batch, so it's going back...
01 August 2010
A bit of a grind
Having reverted to Japanese chisels a while ago, I'm very happy to use them with a single bevel of 25deg (or 30deg) which I can quite easily maintain with the 3M lapping films from Workshop Heaven. It's just a question of working down through successively finer grades until I finish on the 1 micron paper, which is around 8000g or the .3 micron which is much, much finer...
The thought of trying to re-make the primary bevel on much thicker and wider plane blades makes me turn a little pale and queasy though. Yesterday morning, a quick examination of the blades on four of my planes revealed that a little re-dressing of the primary bevel was required as the secondary was becoming just a tad too wide to take a really keen edge.
When I first set up the 'shop, a 'must have' purchase was a Tormek wet grinder, a really superb piece of kit which is getting a bit tatty now, but none the less, is still good. It's seen so much work over the years that the wheel has now been reduced by a full 10mm in diameter, but yesterday it was still a breeze to re-grind four plane blades in around twenty minutes.
Had I been trying to do the same job on the 3M papers, I still wouldn't have finished the first one...
Subscribe to:
Posts (Atom)